pages

Friday, March 9, 2012

vCO - how to find the vlanID of a dvPortGroup

Today I received an interesting question: "How to find out the VLAN ID of a distributed virtual port group?". At the first moment I think: "No problem, cause the vSphere client can also show the information.".

After several hours and searches in the vSphere API and Onyx I realized that there isn´t any direct method for that :(

So I test the illogical things and enhanced the defaultPortConfig attribute about the vlan attribute... and what should I say: There was an atribute!

After testing if the attribute is part of the VcVmwareDistributedVirtualSwitchVlanIdSpec I was able to check the vlan :)


for(i in dvSwitch.portgroup){
System.debug(dvSwitch.portgroup[i].config.defaultPortConfig.vlan);
if(dvSwitch.portgroup[i].config.defaultPortConfig.vlan instanceof VcVmwareDistributedVirtualSwitchVlanIdSpec){
System.debug(dvSwitch.portgroup[i].config.defaultPortConfig.vlan.vlanId);
}
}


This looks like the following screen in the end:


So I hope this helps! By the way, I never had so many failed runs in a row :)

Monday, February 27, 2012

vCO - want fast success? use python!


As you may know I´m always interested in finding new methods to make vCO available in the most common programming languages. Last week some guys developed their web service client in python using the outstanding PyvCO module: http://labs.vmware.com/flings/pyvco

I see their fast and impressive results which took them just a few days and decided to take a look into python using "native" SOAP clients. After reading thru some available modules I decide to use suds: https://fedorahosted.org/suds/ because it seems to have a simple design.

After installing the module on my MacBook with pip install suds the first test is really simple:

import suds
client = suds.client.Client('http://172.16.0.176:8280/vmware-vmo-webcontrol/webservice?wsdl')
print client

This is the output:


As you can see all methods and types are shown with a simple print :)

Based on this and some indents you can produce some real nice functions like this:
import suds

vCOurl = 'http://172.16.0.176:8280/vmware-vmo-webcontrol/webservice?WSDL'
#username = raw_input('Username: ')
#password = raw_input('Password: ')
username = 'USERNAME'
password = 'PASSWORD'

client = suds.client.Client(vCOurl)
#print client

def getAllWfs():
 allWfs = client.service.getAllWorkflows(username, password)
 return allWfs

def findWfs(name):
 Wfs = client.service.getWorkflowsWithName(name, username, password)
 return Wfs

#allWfs = getAllWfs()
allWfs = findWfs(raw_input('Workflow name: '))

for wf in allWfs:
   print wf.name
   print wf.id
   wfInParas = wf.inParameters
   for iParas in wfInParas[0]:
        print 'inParameter: '
        print (iParas.name, iParas.type)
   wfOutParas = wf.outParameters
   for oParas in wfOutParas[0]:
        print 'outParameter: '
        print (oParas.name, oParas.type)

With this you can search for a workflow and get the IN/OUT parameters. As you can see the success comes really fast!


So feel free to post your implementations!

Friday, February 24, 2012

vCO - How to automate Altiris Deployments

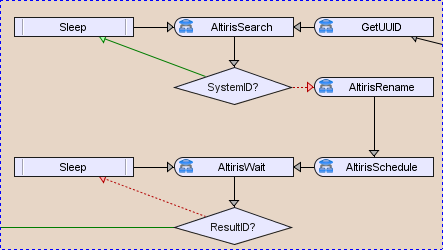
This week I was in Vienna to implement a VM deployment automation based on Altiris. First thing I always ask is: "Why do you use Altiris as deployment mechanism if you have VMware templates?" and in this case the physical deployment was the answer. So Altiris Deployment is used for physical and virtual servers.

What I like when implementing these things is that the customer has the freedom to choose where to deploy. So there are no borders to deploy a VM or vApp in the vCloud Director for example. It´s just a decision field away :)

First thing you need is to have the Altiris SDK installed on your Altiris Deployment Server. You can find the actual version here: http://www.symantec.com/business/support/index?page=content&id=TECH40810

After the installation you will have another IIS website available: /Altiris.ASDK.DS/ which serves the webservice "API". Now we have two options: the SOAP plug-in and native HTTP POST/GET commands. I prefer the HTTP command way cause the SOAP API isn´t available as one WSDL definition.


So the most simple way is to call the Altiris URL for the exact task. In my case I search for the UUID because the system is displayed as VMware-xxxxxxxxxxxxxxxx-xxxxxxxxxxxxxxx, rename the system into the VMname IN-parameter and schedule the exact job for the system. You can find the JobIDs via web-browser on the Altiris.ASDK.DS path.

 The command for searching a system (HTTP GET) could look like this:


var url = "http://"+AltirisServer+"/Altiris.ASDK.DS/ComputerManagementService.asmx/GetComputerID?computerSearchPhrase=";
url += Servername
url += "&computerSearchType=2";
var MyURL = new URL(url);
MyURL.getContent();
var Result = MyURL.result;


So, now have fun to automate your Altiris Deployment :)
Maybe this also could be used to automate the vApp deployment including Altiris for the vCloud Director...


Wednesday, December 28, 2011

vCO - Auto Deploy Plug-in

I used the holidays to test around with the new vCenter Orchestrator Plug-in for VMware Auto Deploy. The main value is that there is no need to use Microsoft Powershell which isn´t really often available in pure linux environments :)

First you have to configure the vCenter Server Appliance to act as a TFTP or DHCP server if this one isn´t already in place. This page describes the DHCP/TFTP configuration:

http://jreypo.wordpress.com/tag/vsphere-auto-deploy/

Once the services are configured you have to download the ESXi depot file from our download area and place it on a webserver. After that you can download the Plug-in for the vCenter Orchestrator and install it with the vCenter Orchestrator configuration interface.


Now you can add the vCenter Server Appliance as a VMware Auto Deploy host:


After adding the host you need to add a depot too. Please note that you have to extract the ESXi depot .zip file downloaded in the beginning cause you have to point to the "index.xml" file in the package.


With the host and depot you can now create a deploy rule and activate it with the included workflows.


You can check the activation really fast by clicking the "Inventory" tab and taking a look into the Auto Deploy tree.


If everything looking as expected you can now check to start a host system (I tested it with some virtual machines) and see if it boots into an ESXi image.


This is just a small quick start, there are some more possibilities (answer files etc.) but it shows how to get your feet on the street. See you next year!

P.S.: The TFTP/DHCP service isn´t a supported scenario. Thanks William for the hint.


Tuesday, December 13, 2011

vCO - How to add a second SCSI controller


Sometimes you will miss some OOTB workflows in your vCenter Orchestrator library. The last time I searched for a workflow the customer task was:

"Add a second disk with a different controller type and and a new bus ID (1)."

Reading this the task sounds really simple, but when searching there is only an "Add disk" workflow in the library which always crashes if you set the bus ID to 1, cause there isn´t a second SCSI controller.
Also there is no workflow to add a second SCSI controller and there is no method in the vSphere Client. So I decide to check how the vSphere client handle this event and used Onyx (http://labs.vmware.com/flings/onyx) to look for the used specifications.

So I found out that there is only an "add disk" method in the vSphere Client which automatically adds a second SCSI controller. With this knowledge I build a workflow which adds a second SCSI controller and then a second hard disk on this SCSI controller.

First make a clone of the "createVirtualScsiControllerConfigSpec" action and change the lines:

controller.key = 1;
controller.busNumber = 1;

Now create a new workflow and add a "Scriptable Task" element and the "vim3WaitTaskEnd" action. My IN parameter are: the VM (VC:VirtualMachine), the diskSize (number), the datastore (VC:Datastore) and the thinProvisioned (boolean) switch. The attributes are: task, progress, pollRate.


In the "Scriptable Task" element I added the lines shown in the screenshot. As you can see I use my cloned action to create the second controller. Than just add the second disk and push all into the array and start the reconfigVM task.

Have fun!


Wednesday, November 30, 2011

vSphere 5 - VCSA and syslog with graylog2

As you may know the vCenter Server Appliance can act as a syslog server for the ESX host-systems. The appliance logs all messages into a log partition (/storage/log) what´s not a real feature if you or your customer uses a syslog server. My customer actually uses Graylog2 (http://graylog2.org/) which is a real cool tool.


In the base configuration you aren´t able to insert a remote syslog server, so you have to access the vCenter Server appliance with ssh. Here you go to the /etc/syslog-ng directory.

In this directory there is a config file called: syslog-ng.conf which you have to open with an editor (vim/less for example).

Now search the line:
#
# Enable this and adopt IP to send log messages to a log server.
#
#destination logserver { udp("10.10.10.10" port(514)); };
#log { source(src); destination(logserver); };

end enter your syslog host, port. Please don´t forget to remove the # before the line :) After these settings you can enhance the Global Options to send the fully qualified domain name:

options { long_hostnames(off); sync(0); perm(0640); stats(3600); use_fqdn(yes); };

After the changes restart the syslog deamon with /etc/init.d/syslog restart and check with tcpdump port 514 if the packages are send. 


Happy logging!

Thursday, November 24, 2011

vCO - wavemaker, your cloud webservice (part II)

Based on the first article I will show you how to interact with the workflows and give them parameters and receive results. As you might assume this is more complex than only a short "getAllWorkflows", but with wavemaker and some instructions it is much easier than develop web-clients in higher programming languages.

First thing we will need is the workflowId which was displayed in the first tab. To copy the ID from the workflow "getFreeDvPorts" you have to change the options of the dojoGrid.


So the "selectionMode" has to be "extended" which allows you to copy the ID of the workflow. Next thing you have to do is to change the IN parameter of the "getFreeDvPorts" workflow into "dvSwitchName" as String and "NumPorts" as Number. I also added an "CriticalGroups" as Array/String OUT parameter. So the inputs are the name of the dvSwitch and the minimum of free ports the port-groups must have. The output shows all critical port-groups without enough ports.


In wavemaker, under the tab "getInventory" you can now add 4 textfields:
  • username
  • password
  • dvSwitchName
  • FreePorts
and a button called "Submit". I also add a TokenID field to control if the workflow is started. Next button is called "Result" and the "dataGrid" is used to show the OUT results of the workflow. I entered the username and password fixed which makes it a bit easier. The page should look like this:


First step is to select the submit button and select a new "Service" for the OnClick event. This service I named "executeWf" and select the reference "vCOlab" and the "executeWorkflow" operation. Now the Submit button is linked with the "executeWorkflow" operation. 


As you can see the "executeWorkflow" operation needs different input parameters. The first two: username and password are easy, cause you only have to bind them to the text fields created in the beginning. The third one is the workflow ID of the "getFreeDvPorts" workflow you can copy from the first "getAllWorkflows" tab (extended editor).

The fourth parameter is very special and William Lam (http://www.virtuallyghetto.com/) and I had some sleepless nights to get the right method. The input parameters "workflowInputs" are set as an expression not as Array/List or something. So you have to insert the following in the expression field:


As you can see the value is linked to the text .dataValue from "dvSwitchName" and "FreeDvPorts". So the name and the ports are defined with the text fields. For the control field you have to link the dataValue of the TokenID field to the return value "id" of the executeWf operation.


This will show the TokenID also when pressing "Submit" and this indicates that the workflow is executed in vCenter Orchestrator.

The next step is to create a new Service for the "Result" button. This is the "getWorkflowTokenResult" operation which also needs some input parameters: username, password and workflowTokenId. The first and second is bind to the appropriate text field. The third one is linked to the TokenId dataValue:


At last you have to bind the dataGrid to the return value of the "getResult" operation. As you can the the empty dataGrid is changed to a name, type and value separation.

If everything is right the execution should look like:


So, I hope this more complex scenario helps you to speed up your personal cloud portal with wavemaker and vCO.

Have fun!